Introducing a colored pencil epoxy floor is more than just an upgrade to your surface—it’s a stylish statement that merges vibrant artistry with the resilience of modern flooring technology. Whether for commercial galleries, creative studios, or even high-traffic residential areas, this innovative flooring solution offers customization, durability, and visual appeal in one package.
In this comprehensive guide, we delve into everything you need to know about colored pencil epoxy floor, exploring its benefits, application process, design possibilities, and maintenance requirements. Discover how this unique flooring option can elevate your space from ordinary to extraordinary, blending aesthetic brilliance with long-lasting performance.
The Vibrant Appeal of Colored Pencil Epoxy Floors – An Artistic Revolution in Flooring Design
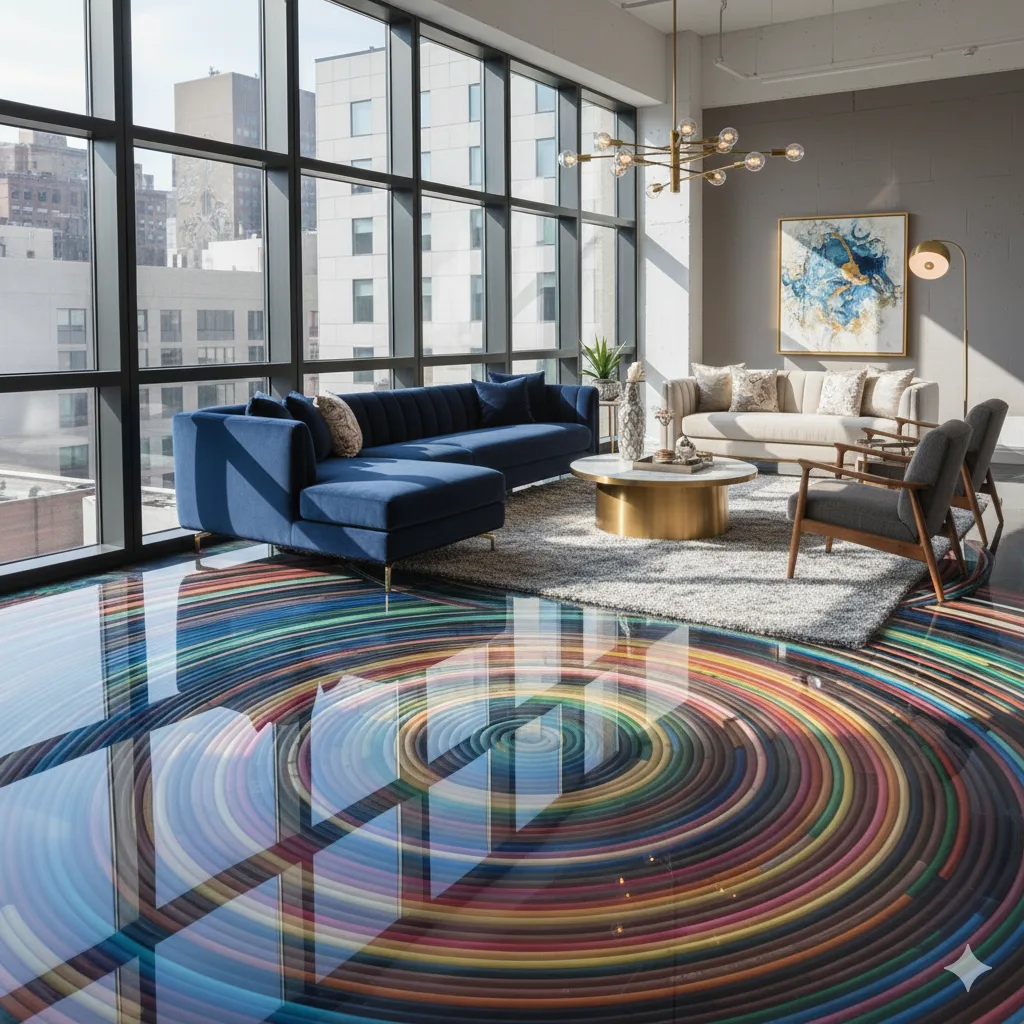
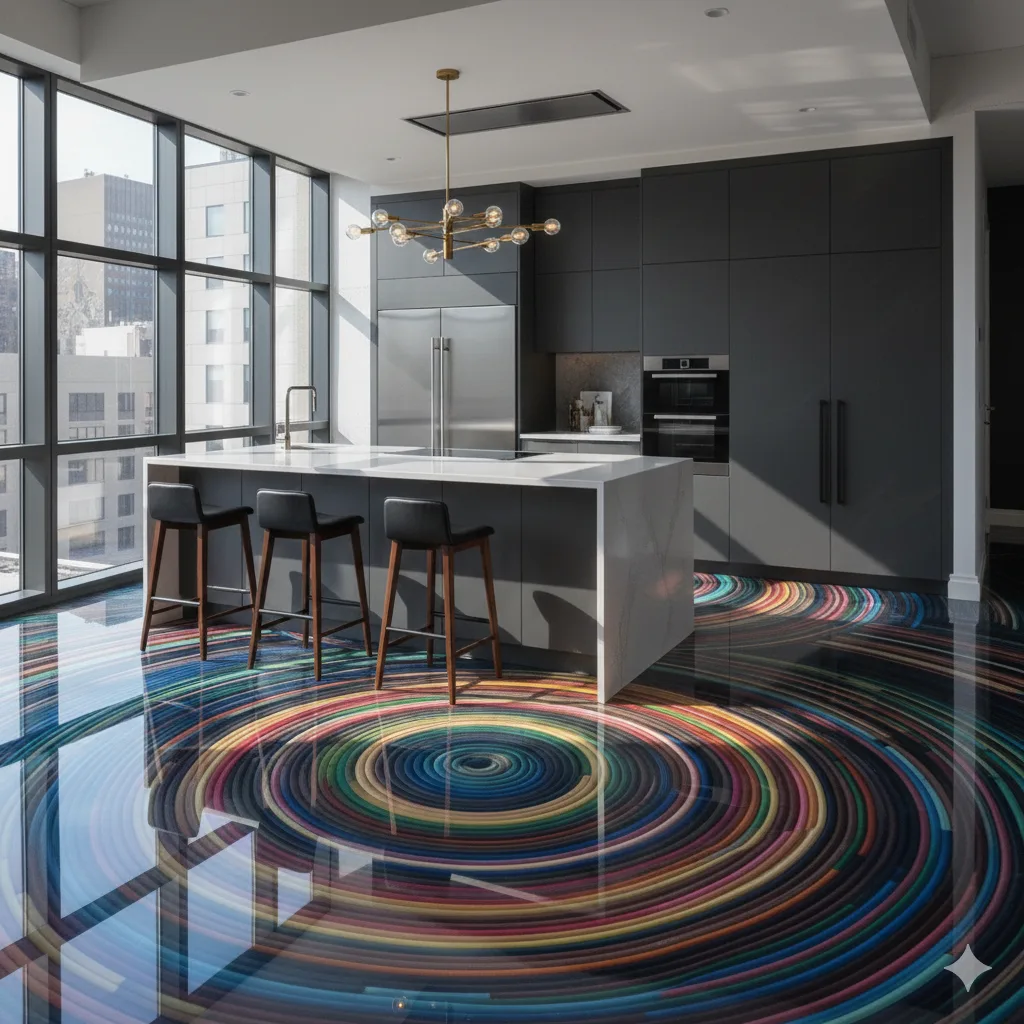
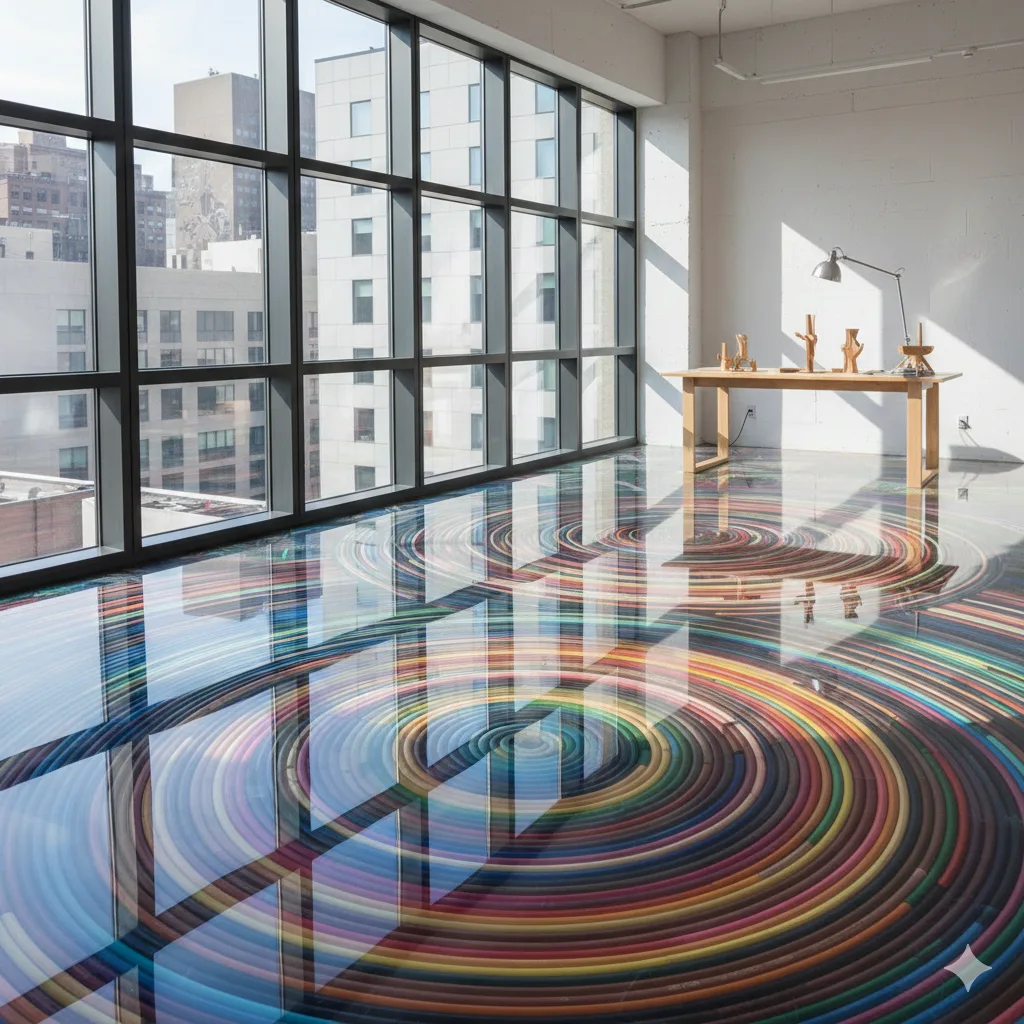
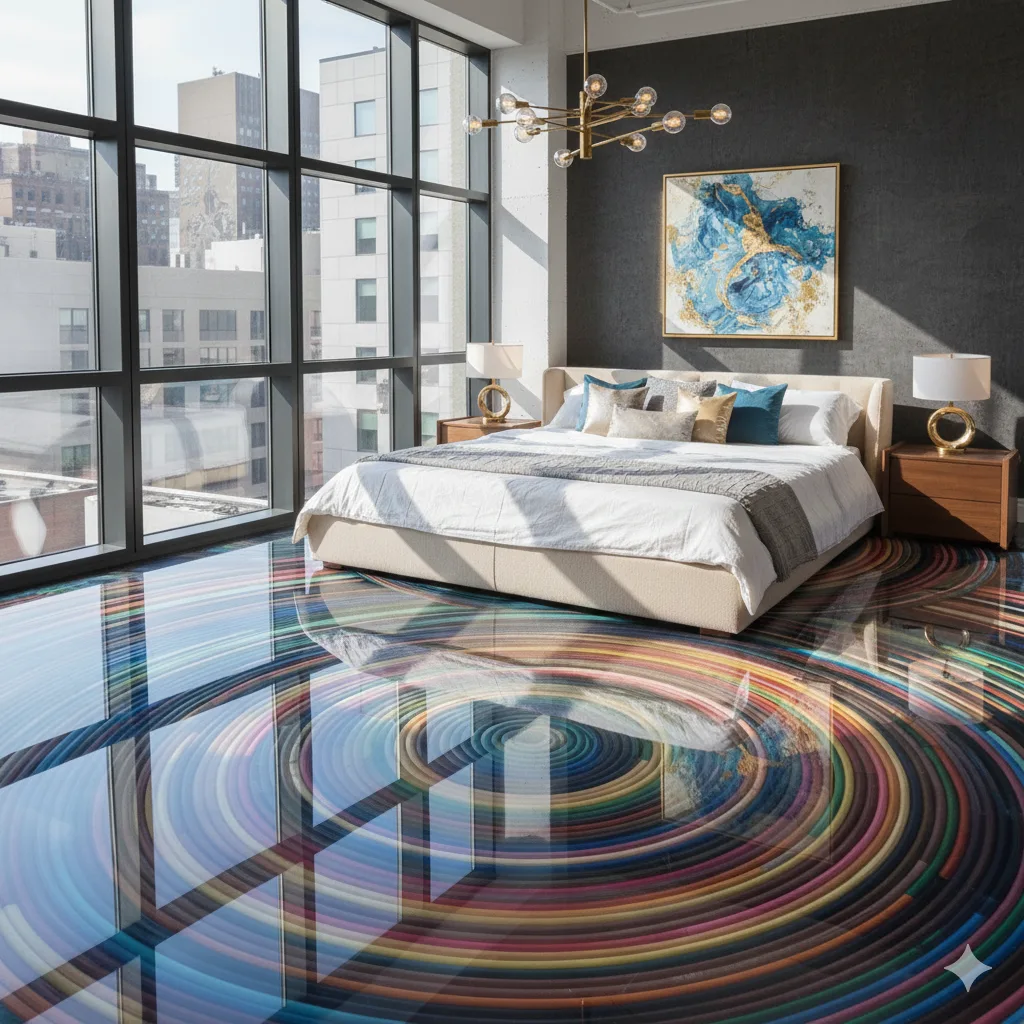
A colored pencil epoxy floor stands out as an eye-catching alternative to traditional flooring options. Its appeal lies in the ability to incorporate a rich palette of colors, mimicking the vivid strokes of a colored pencil drawing, yet offering the robustness of epoxy resin. This convergence of artistry and engineering makes it an ideal choice for creative environments and stylish interiors.
Before fully embracing this innovative flooring, it’s essential to understand its core characteristics, including its aesthetic versatility, resistance properties, and customization options. This knowledge will help you assess whether a colored pencil epoxy floor aligns with your style and functional needs.
The Aesthetic Versatility of Colored Pencil Epoxy Floors
The beauty of a colored pencil epoxy floor lies in its decorative flexibility. It allows seamless integration of multiple colors, creating intricate patterns that resemble hand-drawn artwork or abstract compositions. This flexibility opens up possibilities for personalized designs, themes, or branding elements that can truly reflect your personality or business identity.
One of the advantages of this flooring is its capacity to incorporate gradients, shading, or even detailed images directly into the epoxy. Artists and designers appreciate its capacity to blend hues smoothly, akin to traditional colored pencil art, but with the added benefit of a durable surface. Whether you prefer bold neon accents or subdued pastel shades, the palette options are practically limitless.
The chromatic richness adds a lively energy to the space, making it suitable for settings where creativity and visual impact are priorities. From vibrant workshop floors to boutique retail spaces, a colored pencil epoxy floor can serve as a focal point that captures attention and complements interior decor.
Durability and Resistance – More Than Just Looks
While aesthetic appeal is a major advantage, durability should not be overlooked when selecting flooring options. An ideal epoxy floor must withstand heavy foot traffic, chemical exposure, and environmental wear and tear without losing its charm.
Colored pencil epoxy floors are formulated with high-quality epoxy resins that offer excellent resistance to abrasions, stains, and impacts. This resilience makes them suitable for areas prone to frequent use or where spills and accidents are common. The epoxy’s seamless surface also eliminates cracks and crevices that could harbor dirt or bacteria, enhancing hygiene and ease of maintenance.
Furthermore, many epoxy formulations include UV stabilizers to prevent fading or discoloration over time, even under intense sunlight. This makes colored pencil epoxy floors an excellent choice for outdoor patios, art studios with natural light, or any space demanding longevity and visual integrity.
Customization and Personalization – Bringing Art to Life Underfoot
Customization is the cornerstone of colored pencil epoxy floors. Unlike standard flooring options, epoxy allows for precise control over color placement, saturation, and pattern creation. Artists and clients can collaborate to design bespoke motifs, whether abstract splashes, detailed illustrations, or corporate logos.
The process begins with a base coat of clear or colored epoxy, onto which pigments are meticulously applied using brushes, spatulas, or spray techniques. Additional layers of epoxy can then be added to enhance depth, shading, and texture. The result looks akin to a hand-drawn masterpiece but with the durability of industrial-grade flooring.
This level of personalization also extends to finishes—matte, satin, or high-gloss—giving you the ability to tailor the look to match any interior style. Technical considerations such as slip resistance and surface texture can be integrated into the design to enhance safety without compromising on visual appeal.
Application Process of Colored Pencil Epoxy Floors – From Concept to Reality
Transforming your space with a colored pencil epoxy floor involves a structured process, combining technical steps with creative design. Understanding each phase helps ensure a successful installation that meets aesthetic goals and performance standards.
Before beginning, the existing surface needs assessment and preparation. The process typically includes cleaning, repairing cracks or unevenness, and applying a primer to ensure proper adhesion. Once the surface is ready, the actual coating and painting process can commence.
Preparing the Surface for Epoxy Coating
Surface preparation is critical to ensure the longevity and appearance of the epoxy floor. Dust, grease, or loose materials can compromise adhesion, leading to peeling or bubbling over time.
The process involves thoroughly cleaning the surface with degreasers or solvents. Repair work, such as filling cracks or smoothing out uneven patches, is performed to create an optimal substrate. In some cases, mechanical abrasion or sanding is necessary to enhance the grip of the epoxy.
Applying a primer tailored for epoxy enhances bonding between the concrete or substrate and the epoxy layer. This step is vital, especially if the existing surface is porous, painted, or damaged.
Creating Art in Layers – Applying Colors and Textures
Once the surface is prepared, the installation moves into the creative phase. A base epoxy layer is applied uniformly, serving as the canvas for artistic embellishments. Artists and technicians work together to lay down pigments either by hand application or controlled spraying, mimicking colored pencil strokes.
Layering translucent or opaque pigments allows for depth and shading, enhancing the appearance of a hand-colored drawing. Artists can introduce textures by manipulating the epoxy with brushes, spatulas, or other tools, adding dimension to the design.
In some cases, protective topcoats are applied after the artwork is finished, locking in the design and providing additional resistance. These finishes may come in matte or gloss variants, depending on aesthetic preferences, and can embed slip-resistant additives if needed.
Curing and Maintenance – Ensuring Longevity
The curing process is crucial to achieving optimal hardness and adhesion. Epoxy typically requires several days to fully cure, during which foot traffic and exposure to moisture should be minimized.
Proper curing ensures that the colored pencil epoxy floor maintains its vibrant appearance and structural integrity. After curing, routine cleaning with gentle, non-abrasive solutions helps preserve colors and surface quality. Avoiding harsh chemicals and abrasive cleaning tools extends the flooring’s lifespan.
Over time, small touch-ups may be necessary to repair minor damages or refresh colors. With proper maintenance, a colored pencil epoxy floor can remain an artistic centerpiece for many years, demonstrating both beauty and resilience.
FAQs about Colored Pencil Epoxy Floor – Your Questions Answered
What are the main benefits of choosing a colored pencil epoxy floor?
A colored pencil epoxy floor combines aesthetic customization with high durability, resistance to wear and stains, seamless surfaces for hygiene, and the ability to personalize designs, making it ideal for artistic or functional spaces.
How long does it take to install and cure the epoxy floor?
The installation process typically takes a few days, including surface preparation, epoxy application, and dry/cure time. Full curing can take up to a week, depending on environmental conditions and specific epoxy formulations.
Is a colored pencil epoxy floor suitable for outdoor use?
Yes, with appropriate UV-stabilized epoxy formulations and protective coatings. It can withstand outdoor elements while maintaining vibrant colors, provided it is properly sealed and maintained.
Can I customize the colors and patterns easily?
Absolutely. The procedural flexibility allows artists to incorporate intricate designs, shading, gradients, or branding elements seamlessly into the epoxy surface, making each floor truly unique.
How do I maintain and clean a colored pencil epoxy floor?
Routine cleaning involves gentle sweeping or mopping with mild detergents. Avoid harsh chemicals or abrasive tools that could damage the finish. Regular maintenance preserves color vibrancy and surface integrity.
A colored pencil epoxy floor is a distinctive choice that merges artistic expression with durable functionality. Its vibrant colors and customizable patterns transform ordinary surfaces into captivating visual statements, suitable for diverse environments—from creative studios to commercial spaces. The application process, while technical, offers ample room for artistic imagination, creating personalized designs that can withstand the rigors of daily use. Proper surface preparation, layer application, and maintenance ensure the longevity of the aesthetic appeal and structural integrity of the epoxy flooring. Ultimately, selecting a colored pencil epoxy floor provides a unique opportunity to elevate your environment, making it both beautiful and resilient — a true testament to the union of art and engineering.